top of page
NICO ESSIG
PORTFOLIO
ABOUT
NEWS
Items 1
TUTORIALS
CONTACT
SHOP
New Page
New Page
New Page
More
Use tab to navigate through the menu items.
Войти
Expert Music Production Tutorials and Guides
How To`s
Смотреть
Смотреть
Stop Pitching, Start SHIFTING! 🍯 (Vocal Secret Sauce)
The Vocal Trick You Didn’t Know You Needed 🤫 Want to transform your vocal character instantly? Formant shifting is the ultimate "secret sauce" for unique textures. The Quick Steps: Isolate your vocal track. Open a Formant Shifter (like Little AlterBoy or your DAW's stock shifter). Shift Down for a deep, chesty, "boss" vibe. Shift Up for a thin, tight, "pop" character. Subscribe for more 60-second mixing secrets! 🎹 #musicproduction #mixingvocals #vocalfx #sounddesign #beatmaker #homestudio
Смотреть
Смотреть
How to get CRYSTAL CLEAR vocals like Sabrina Carpenter's "Espresso"
Sabrina Carpenter's "Espresso" vocal sound is bright, expensive, and radio-ready. In this tutorial, I break down the COMPLETE vocal chain using 8 aux sends and the secret +0.4 formant shift that creates that signature pop shimmer. ☕✨ Buy it here: https://www.nico-essig.com/product-page/sabrina-carpenter-espresso-vocal-chain 🎚️ THE COMPLETE CHAIN: - RComp (Foundation Compression) - SSL Channel EQ (That $10K Brightness) - Little AlterBoy (+0.4 Formant Shift) ← THE SECRET - Plate Reverb (Space & Depth) - EchoBoy Dual Delays (Rhythmic Width) - Microshift (Heavy Stereo Spread) - Waves Doubler (Quad Mode + Octave Down) - iZotope Vocal Doubler (96% Separation) - J37 Tape Delay (Vintage Movement) - High Octaves (Little AlterBoy +12) The key? That +0.4 formant shift. It's what makes the vocal sound expensive and polished without sounding processed. This is what most tutorials miss. ⏱️ TIMESTAMPS: 0:00 - Intro: The "Espresso" Sound 0:45 - RComp: The Foundation 1:16 - SSL Channel EQ: Brightness 2:15 - The +0.4 Formant Shift Secret (Little AlterBoy) 3:05 - Reverb + Main Delays 4:50 - Width & Doubler Effects 6:05 - High Octaves Layer 6:27 - Outro & Results 🎤 GEAR I USE: Pro Tools 2025 Avid OMNI 💬 Who should I break down next? Chappell Roan? Olivia Rodrigo? Tate McRae? Drop your requests in the comments! 🔔 Subscribe to Audio Sweetener for more pro mixing tutorials and vocal breakdowns! --- 🙌 SUPPORT THE CHANNEL: ☕ https://buymeacoffee.com/neoronez Patreon (Exclusive Content): https://www.patreon.com/c/AudioSweetener Shop Vocal Templates: https://www.nico-essig.com/shop 📱 CONNECT WITH ME: Instagram: https://www.instagram.com/nico_essig TikTok: https://www.tiktok.com/@nico_essig Website: https://www.nico-essig.com 🎧 GEAR RECOMMENDATIONS: Equipment I Use: https://amzn.to/4cbrDzJ --- #SabrinaCarpenter #Espresso #VocalMixing #MusicProduction #ProTools #MixingTutorial #PopVocals #VocalChain #AudioSweetener
Смотреть
Смотреть
Why Your Mixes Sound Amateur (5 Pro Mixing Secrets)
Why Your Mixes Sound Amateur (5 Pro Mixing Secrets) Stop fighting your mixes and start thinking like a pro. Most beginners think they need expensive gear or fancy plugins to get a "radio-ready" sound, but the truth is that professional mixing is about how you think, not what you buy. In this video, I’m breaking down the 5 mixing decisions that separate amateur tracks from professional ones. Having mixed over 100 songs this year, I hear these same 5 mistakes constantly. I’ll show you the exact professional approach to fix them instantly using any DAW. What We’re Covering: • Secret 1: Gain Staging (The Foundation): Why you need to stop slapping plugins on tracks without checking levels. Learn how to use clip gain to create headroom so your compressors and EQs actually work as designed. • Secret 2: Subtractive EQ: Stop boosting highs to find "clarity." I show you why cutting mud (200-400 Hz) is the fastest way to clean up a mix and create space. • Secret 3: Compression for Tone: Most amateurs use compression for volume; pros use it for character. Learn the difference between an 1176 for attitude and an LA-2A for warmth. • Secret 4: Referencing: Don't mix in isolation. Learn how to use professional reference tracks throughout your process to reset your perception and keep your ears honest. • Secret 5: Strategic Breaks: Ear fatigue is the silent mix killer. I explain why mixing in 45-60 minute blocks is a strategic necessity, not a luxury. Timestamps: 0:00 – The 5 decisions that separate Amateur vs. Pro 0:17 – Meet Nico: Lessons from mixing 100+ songs 0:27 – SECRET 1: Proper Gain Staging (Stop the clipping!) 1:48 – SECRET 2: Subtractive EQ (Cut before you boost) 2:33 – SECRET 3: Using Compression as a Tone Shaper 3:58 – SECRET 4: How to use Reference Tracks effectively 5:02 – SECRET 5: Managing Ear Fatigue & Taking Strategic Breaks 6:18 – Summary & What’s coming in Video 3 🙌 Support the Channel & Get More Content! Help me create more in-depth tutorials : ☕ https://buymeacoffee.com/neoronez ➡️ https://www.patreon.com/c/AudioSweetener Shop Vocal Templates: https://www.nico-essig.com/shop More Ways to Help & Connect: • 🛒 Shop Vocal Templates: Explore my full range of professional vocal presets:https://www.nico-essig.com/shop • 📸 Follow on Socials: Stay updated and connect with me! https://www.instagram.com/nico_essig https://www.tiktok.com/@nico_essig • 🌐 My Website: For more news, portfolio, and insights: https://www.nico-essig.com/ • 🎧 Equipment Recommendations: Gear I use and recommend:https://amzn.to/4cbrDzJ • ▶️ My YouTube Channel: Subscribe for more mixing secrets!https://www.youtube.com/channel/UC397SZv7zBQ2f5nmOXsFhhQ Resources Mentioned: • Next Video Preview: I'll be giving away my Complete Pro Tools Mixing Template for free! Make sure you're subscribed so you don't miss the download link. • Let's Connect: Want to see these techniques on a full mix? Let me know in the comments! #MixingSecrets #MusicProduction #HomeStudio #AudioEngineering #MixingAndMastering #NicoMixes #DAWTips #BedroomProducer
Смотреть
Смотреть
The ONE Stream Deck Command Every Pro Tools User Needs
The ONE Stream Deck command that changed everything #protools #streamdeck #musicproduction
Смотреть
Смотреть
I Saved 100 Hours Mixing with These 10 Shortcuts
🚀 10 Pro Tools Stream Deck Commands That Saved Me 100+ Hours Mixing This Year These 10 Stream Deck commands completely transformed my Pro Tools mixing workflow. I've mixed over 100 songs this year using this exact setup, and today I'm showing you what they do and why they're so powerful. This is the ultimate, battle-tested Stream Deck configuration for any Pro Tools engineer looking to automate repetitive tasks like bussing, track creation, and stem bouncing. Stop clicking through menus and start mixing faster! ⏱️ 10 Essential Commands & Timestamps 0:00 - Intro 0:50 - Command 1: Create New Track 1:15 - Command 2: Make Track Active/Inactive 1:50 - Command 3: Zoom Presets 2:25 - Command 4: Automation Modes 3:00 - Command 5: Insert Favorite Plugins 3:35 - Command 6: Track Bussing and Colors 4:10 - Command 7: Bussing to Numbered Busses 4:45 - Command 8: Bounce Stems 5:20 - Command 9: Navigate to Marker 5:55 - Command 10: Input Monitor Toggle 🔗 Resources & Next Steps Free Keyboard Maestro Macro for "Insert SSL Channel" : https://rkns.link/ap1e0 Get a stream deck my here : (Amazon Affiliate Link) • Stream Deck Plus : https://amzn.to/48MWUJL • MkII: https://amzn.to/4oE8hZf • XL : https://amzn.to/4qs8pMZ • Mini : https://amzn.to/4oaIHeB • Neo : https://amzn.to/47qOTYQ Protools Icon Pack : https://marketplace.elgato.com/product/protools-audio-sweetener-icon-pack-9e0622ad-4fa1-4da8-abc7-9c2452b46c31 For all Stream Deck Templates Purchase go here: https://www.nico-essig.com/shop If you find these videos useful, here are a few things you can do to help us out: If you are interested in purchasing a starter Protools Templates: Basic Protools Stream Deck Profile with Shortcuts: https://www.nico-essig.com/product-page/basic-protools-transport-shortcuts Basic Protools Template https://www.nico-essig.com/product-page/basic-protools-template-1 Includes : • My Main protools Stream deck page • Track Setup Page (Routing to different instrument ) • Color Palette Drop a "Follow" on our Socials : https://www.instagram.com/nico_essig/ https://www.tiktok.com/@nico_essig For more news and portfolio material: https://www.nico-essig.com/ Equipment recommendations and more : https://www.nico-essig.com/shop Stream Deck Setup Tutorial: https://youtu.be/Ex4YHOVNxZw 💬 Want a detailed setup tutorial for these commands? Drop "SETUP" in the comments and I'll make an updated walkthrough! 🔔 Subscribe to Audio Sweetener for more Pro Tools workflows and mixing tutorials! ------ pro tools, stream deck, music production, mixing, audio engineer, workflow, productivity, DAW, pro tools tutorial, stream deck tutorial, keyboard maestro, mixing engineer, audio sweetener, pro tools shortcuts, stream deck commands, music production workflow, pro tools 2025, elgato stream deck, mixing workflow, audio production #protools #streamdeck #musicproduction #mixing #audioengineering #workflow #productivity #daw #protoolstutorial #protoolsshortcuts #audiohacks #save time mixing #keyboardmaestro
Смотреть
Смотреть
Stream Deck + Protools Basic Profile Overview and Install
Stream Deck with Protools Basic Profile overview and install easy install to get your started with protools and your stream deck journey no extra software needed how to use a stream deck with protools
Смотреть
Смотреть
Stream Deck + DAW = Workflow with Keyboard Maestro
Stream Deck Quick started guide with Keyboard Maestro • Elgato Market place KM Link Pluging : https://marketplace.elgato.com/product/kmlink-00461192-91a1-4a50-949e-73067be6642e • Elgato Streamdeck app : https://www.elgato.com/us/en/s/downloads?gad_source=1&gad_campaignid=22213660743&gclid=CjwKCAiA24XJBhBXEiwAXElO30X0KwsLpq9LWhKxDHF4-dhxoS8Bn74pSsdhxZifdNUYVwDMfuHDOBoCo54QAvD_BwE • Keyboard Maestro : https://www.keyboardmaestro.com/main/ • Free Keyboard Maestro Macro for "No Input" : https://www.nico-essig.com/product-page/no-input-macro Using an Elgato Stream Deck is a huge time saver! Get a stream deck my here : (Amazon Affiliate Link) • Stream Deck Plus : https://amzn.to/48MWUJL • MkII: https://amzn.to/4oE8hZf • XL : https://amzn.to/4qs8pMZ • Mini : https://amzn.to/4oaIHeB • Neo : https://amzn.to/47qOTYQ Protools Icon Pack : https://marketplace.elgato.com/product/protools-audio-sweetener-icon-pack-9e0622ad-4fa1-4da8-abc7-9c2452b46c31 For all Stream Deck Templates Purchase go here: https://www.nico-essig.com/shop If you find these videos useful, here are a few things you can do to help us out: Drop a "Follow" on our Socials : https://www.instagram.com/nico_essig/ https://www.tiktok.com/@nico_essig For more news and portfolio material: https://www.nico-essig.com/ Equipment recommendations and more : https://www.nico-essig.com/shop ---- Timeline : 00:00 - intro 00:08 - install KM LINK 00:39 - create Keyboard Maestro Macro 00:51 - Add Macro to Stream Deck 01:07 - customize Icon 01:15 - Final Thoughts --- I Love using my Stream Deck for triggers. It really improves my Work Flow! I would recommend any music producer to try it! it has so much potential! Keyboard maestro basically : A trigger creates An action or sets of actions. Called Macros. • Keyboard Maestro is not available for Windows but there are plenty of alternatives that runs on Windows with similar functionality. The best Windows alternative is AutoHotkey, which is both free and Open Source. You don't need Soundflow to create your own shortcuts, it is easier than you think, AND CHEAPER!!! If you are interested in getting my shortcuts please message me and i can make them available. Video on how to Setup an Elgato Stream deck with Keyboard Maestro: https://youtu.be/I7Cm3VOIrzQ https://www.nico-essig.com/shop --------- Youtube Channel: https://www.youtube.com/channel/UC397SZv7zBQ2f5nmOXsFhhQ thank you! --------- Please follow us and comment if this is helpful! 🚀 Stream Deck Setup in 90 Seconds: Connect to Pro Tools or Any DAW using Keyboard Maestro! Just bought an Elgato Stream Deck and Keyboard Maestro? Stop clicking and start automating! This 90-second essential guide shows you exactly how to install the required plugin and link your Stream Deck to Pro Tools (or any DAW) to create one-press button magic. The crucial first step to creating custom macros and shortcuts that will save you hours of menu diving and repetitive clicking. 🔑 Essential Steps & Timestamps: • [00:04] The Goal: Creating One-Press Button Magic • [00:09] Step 1: Where to find and install the KM Link Plugin (The best Stream Deck plugin) • [00:33] Step 2: How to select your Keyboard Maestro Macro in the Stream Deck app • [01:13] Step 3: Testing the Automation and Next Steps How to use stream deck with any DAW,How to use stream deck,how to setup a stream deck,elgato stream deck,how to use stream deck with protools,elagto stream deck with protools,Keyboard Maestro,Keyboard maestro with protools,protools shortcuts,DAW workflow,Elgato Stream Deck + Pro Tools,pro tools tutorial,how to use stream deck,stream deck soundboard,pro tools keyboard shortcuts,pro tools key commands,stream deck setup,keyboard maestro tutorial,create new tracks protools,How to use stream deck with any DAW,How to use stream deck,how to setup a stream deck,elgato stream deck,how to use stream deck with protools,elagto stream deck with protools,Keyboard Maestro,Keyboard maestro with protools,protools shortcuts,Elgato Stream Deck + Pro Tools,pro tools tutorial,pro tools keyboard shortcuts,pro tools key commands,stream deck setup,keyboard maestro tutorial,Pro tools shortcuts,best pro tools shortcuts
Смотреть
Смотреть
Pro Tools: 1-Button Automation Mode Switch (Game Changer)
Get it here: https://www.nico-essig.com/product-page/protool-tracks-automation-for-stream-deck Stop wasting time clicking! 🖱️ This quick hack lets you switch Pro Tools automation modes (Read, Write, Latch, Touch, Trim) instantly using a Stream Deck and Keyboard Maestro. Learn how to automate your mix workflow and stop breaking your creative flow! #streamdeckprotools #ProToolsHacks #mixingtips #protoolsautomations
Смотреть
Смотреть
Protools 2025 + Stream Deck = work flo power house 💪🏼
Protools 2025 + Stream Deck = work flo power house 💪🏼 Stop Searching. Start Producing. If you loved the workflow setup shown in the video and want to instantly download the template for your own Stream Deck, click here. All the essential Pro Tools shortcuts, already mapped and organized for maximum speed. Editing Modes Transport Zoom And so much more more ➡️ Get the Pro Tools Workflow Template Here https://www.nico-essig.com/product-page/basic-protools-transport-shortcuts
Смотреть
Смотреть
👨🎤 👩🏽🎤 🧑🎤 Choire vocal effect #audio
👨🎤 👩🏽🎤 🧑🎤 Choire vocal effect #audio effects for a wide choire vocal sound
Смотреть
Смотреть
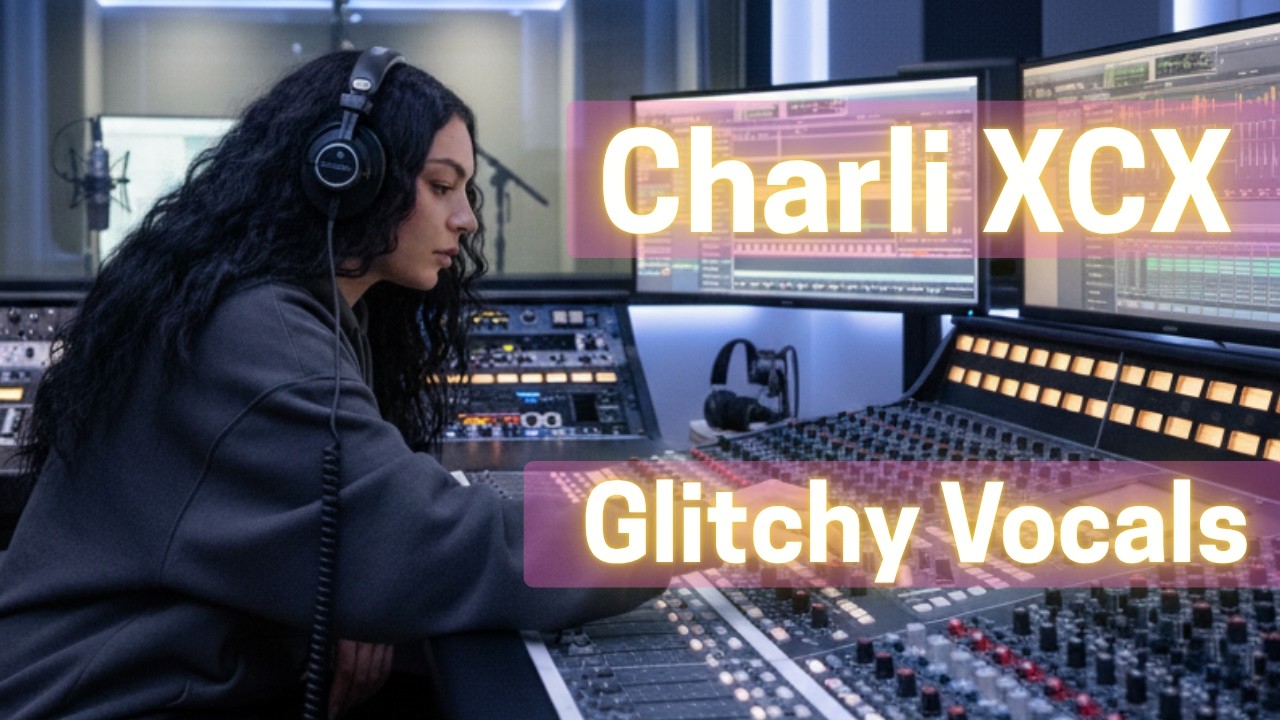
Charli XCX Vocals Tutorial: Hyperpop Basics - FOREVER
Charli XCX Vocals Tutorial: The Hyperpop Effects (Nectar, Morphoder, Reverbs) - FOREVER 🤖 Charli XCX's ROBOTIC Vocal Sound: How to use Morphoder & Aggressive Autotune for Hyperpop Master the distinctive, heavily processed vocal tone of Charli XCX, the cornerstone of the Hyperpop and PC Music aesthetic! This is not basic mixing—it's a deep dive into aggressive pitch correction and advanced formant shifting to create that signature metallic, robotic sound. If you are trying to achieve the sounds of 100 gecs, A. G. Cook, or Slayyyter, this tutorial is essential. 🔑 Advanced Techniques & Timestamps: • 00:26 Achieving Aggressive Pitch Correction using iZotope Nectar • 00:48 The Secret to the Metallic Vibe: Using Soundtoys Little AlterBoy for Formant Shifting • 01:21 The Robotic Core: Setting up the Morphoder (Vocoder) effect • 01:46 Blending the Vocoder: How to mix the Wet/Dry Signal for the perfect Hyperpop balance Welcome back, producers and engineers! If you're following along, you've already laid the groundwork with a well-edited, compressed, Melodyned, and EQ'd foundation we're diving into the creative and often aggressive effects that define Charli XCX's signature hyperpop vocal sound, specifically from her track "Forever"! In this advanced tutorial • iZotope Nectar: Achieving that aggressive, robotic tuning. • Morphoder: Crafting synthetic textures and iconic vocal transformations. • Multiple Reverbs & Delays: Building immense space and rhythmic movement. 🔗 Get the "Charli XCX - Forever" Inspired Vocal Template! Instantly recreate this entire part sound in your own projects: 🙌 Support the Channel & Get More Content! Help me create more in-depth tutorials and become a patron: ➡️ https://www.patreon.com/c/AudioSweetener More Ways to Help & Connect: • 🛒 Shop Vocal Templates: Explore my full range of professional vocal presets:https://www.nico-essig.com/shop • 📸 Follow on Socials: Stay updated and connect with me! https://www.instagram.com/nico_essig https://www.tiktok.com/@nico_essig • 🌐 My Website: For more news, portfolio, and insights: https://www.nico-essig.com/ • 🎧 Equipment Recommendations: Gear I use and recommend:https://amzn.to/4cbrDzJ • ▶️ My YouTube Channel: Subscribe for more mixing secrets!https://www.youtube.com/channel/UC397SZv7zBQ2f5nmOXsFhhQ ⏰ Timestamps: • 0:00 Introduction • 0:30 Autotuning - Nectar 3 • 1:08 Soundtoys Little Alterboy (Formant Shift) • 1:30 Aux 1: Morphoder (Fast Talk) & Doubler • 2:31 Aux 2: Morphoder (Organic Texture) • 3:15 Aux 3: Soundtoys Microshift • 3:35 Aux 4: Pitch II (High Octave) • 3:55 Aux 5: Soundtoys Echoboy (Movement) • 4:22 Aux 6: Plate Reverb • 4:18 Aux 7: Spring Reverb • 5:20 Before vs After (final Sound) • 5:43 Conclusion Disclaimer: A sound-alike vocal and beat was used for this tutorial to demonstrate mixing techniques inspired by Charli XCX's production style. #️⃣ Relevant Hashtags & Keywords (for YouTube Tags Section): #CharliXCX #VocalMixing #MusicProduction #CharliXCXForever #ForeverSong #VocalTutorial #AudioMixing #StudioSecrets #CharliXCXVocals #VocalChain #HowToMixVocals #VocalProduction #MixingTutorial #HomeStudio #AudioEngineering #VocalEffects #Nectar #Morphoder #Soundtoys #Echoboy #PlateReverb #Microshift #SpringReverb #PitchShift #Doubler #Hyperpop #RoboticVocals #SyntheticVocals #FuturePop #PopProduction #SoundDesign #ProTools (or your DAW) #NicoEssig #AudioSweetener #VocalSound #MixingTips #VocalProcessing #AggressiveVocals #TexturedVocals #MixingSecrets #VocalCoach #SoundLikeCharliXCX #SingLikeCharliXCX #PopMusicProduction #VocalStems #VocalEffect #MusicProductionTips #VocalSoundEffects #HowToSoundLikeCharliXCX
Смотреть
Смотреть
Acoustic guitar sound tutorial - " I’ll Keep Calling Out Your Name " Eliz
Acoustic guitar sound tutorial - " I’ll Keep Calling Out Your Name " Eliz
Смотреть
Смотреть
🤖 Charli XCX Vocals Sound Tutorial 🦾 "Forever"
🤖 Charli XCX Vocals Sound Tutorial 🦾 "Forever"
Смотреть
Смотреть
Billie Eilish Vocals Tutorial: The Magic of Effects (Reverb, Microshift, Delay) - BLUE
**"Billie Eilish Vocals Tutorial: The Creative Effects (Reverb, Microshift, Delay) - BLUE"** **✨ Finish the Billie Eilish "Blue" vocal sound: Part 2 – The Creative Effects are HERE! ✨** Welcome back, producers and engineers\! If you watched **Part 1: The Foundation**, you've already laid the groundwork with solid Compression, EQ, and De-essing for that crisp, upfront Billie Eilish tone in "Blue." Now, in **Part 2**, we're diving into the **creative effects** that truly glue it all together and give her vocals that ethereal, intimate, and signature vibe\! In this advanced tutorial, we'll master the "magic" of: * **Plate Reverb:** Adding space and depth without muddiness. * **Microshift:** Crafting subtle width and lushness. * **Delay Throws:** Implementing those iconic, rhythmic vocal delays. Watch as we take our perfectly processed foundation and transform it into a captivating, fully-realized Billie Eilish vocal, just like in "Blue." Don't just mix vocals, *create an atmosphere* that draws listeners in. **🔥 Ready to add the final polish and atmosphere? Let's go\! 🔥** --- **🔗 Get the "Billie Eilish -" Inspired Vocal Template** Instantly recreate this entire two-part sound in your own projects: ➡️ https://www.nico-essig.com/product-page/billie-eilish-happier-than-ever-vocal-template **▶️ Missed Part 1? Catch up here:** https://youtu.be/pIerTSMkEnQ --- 🙌 Support the Channel & Get More Content! Help me create more in-depth tutorials : ☕ https://buymeacoffee.com/neoronez ➡️ https://www.patreon.com/c/AudioSweetener Shop Vocal Templates: https://www.nico-essig.com/shop --- **More Ways to Help & Connect:** * **🛒 Shop Vocal Templates:** Explore my full range of professional vocal presets: https://www.nico-essig.com/shop](https://www.nico-essig.com/shop * **📸 Follow on Socials:** Stay updated and connect with me! https://www.instagram.com/nico_essig https://www.tiktok.com/nico_essig * **🌐 My Website:** For more news, portfolio, and insights: https://www.nico-essig.com * **🎧 Equipment Recommendations:** Gear I use and recommend: https://amzn.to/4cbrDzJ * **▶️ My YouTube Channel:** Subscribe for more mixing secrets! https://www.youtube.com/channel/UC397SZv7zBQ2f5nmOXsFhhQ --- **⏰ Timestamps:** * 0:00 Introduction * 0:30 Plate Reverb * 1:18 Microshift for Width * 2:54 Crafting Delay Throws * 4:20 Full Vocal Chain Playback * 4:48 Conclusion --- **Disclaimer:** A sound-alike vocal and beat was used for this tutorial to demonstrate mixing techniques inspired by Billie Eilish's production style. --- **\#️⃣ Relevant Hashtags & Keywords (for YouTube Tags Section):** \#BillieEilish \#VocalMixing \#MusicProduction \#BillieEilishBlue \#BlueSong \#VocalTutorial \#AudioMixing \#StudioSecrets \#BillieEilishVocals \#VocalChain \#HowToMixVocals \#VocalProduction \#MixingTutorial \#HomeStudio \#AudioEngineering \#VocalEffects \#PlateReverb \#Microshift \#DelayThrows \#SoundDesign \#ProTools (or your DAW) \#NicoEssig \#AudioSweetener \#VocalSound \#MixingTips \#VocalProcessing \#CrispVocals \#IntimateVocals \#MixingSecrets \#VocalCoach \#SoundLikeBillieEilish \#SingLikeBillieEilish \#BirdsOfAFeather \#GettingOlder \#VocalStems \#VocalEffect \#MusicProductionTips \#VocalSoundEffects \#HowToSoundLikeBlue ---
Смотреть
Смотреть
5 Plugins - Country Pop Vocal Sound
5 Plugins - Country Pop Vocal Sound
Смотреть
Смотреть
Billie Eilish Vocals Tutorial: The Right Start (EQ, Compression) - BLUE
🤫 Billie Eilish's SECRET Low-Volume Compression Trick! (Get CRISP Whispers) Stop struggling to make quiet, intimate whispers cut through the mix! This tutorial is the essential Part 1 to achieving Billie Eilish's signature ethereal vocal sound, focusing on the foundation of aggressive compression and surgical EQ. Learn the specific compression ratio and attack time needed to lift delicate whispers without creating a distracting 'pumping' sound. This is the crucial first step to her famous vocal chain. 🔑 Key Techniques & Timestamps: • [0:39] Aggressive 7:1 Compression Ratio: Why it's essential for whisper vocals. • Using a Slow Attack to Preserve Clarity and Punch • [1:49] Surgical EQ Moves to Create Space for the Ethereal Effects • [3:30] Setting the De-Esser to Control Sibilance on Whisper Tracks Billie Eilish Blue Vocals Tutorial: The Foundation (EQ, Compression, De-essing) - BLUE ➡️ Don't miss Part 2: The Creative Effects! Coming next https://youtu.be/ezVSqlEFDSY Foundation (Raw & Polished) - Before & After Mix" ✨ Uncover the SECRET behind Billie Eilish's iconic vocals in "Blue" ! ✨ Ever wondered how to achieve that crisp, upfront, and incredibly intimate vocal sound that defines Billie Eilish's tracks, specifically in a song like **"Blue"**? In this essential tutorial, we're diving deep into ** Part 1: The Foundation** of her vocal production. Watch us transform a raw vocal into a polished, Billie-esque masterpiece right before your eyes with a powerful **Before & After** comparison\! We'll break down the core processing chain for that signature tone, focusing on: * **Compression:** Achieving her consistent, upfront presence. * **EQ:** Shaping the warmth, clarity, and air. * **De-Essing:** Taming harshness for a smooth finish. This is where the magic begins\! Learn the techniques pros use to lay down that solid vocal bedrock. Don't miss Part 2, where we'll explore the creative effects that glue it all together (Plate Reverb, Microshift, and Delay Throws)! **🔥 Ready to elevate your mixes? See the transformation\! 🔥** --- **🔗 Get the "Billie Eilish " Inspired Vocal Template\!** Recreate this sound instantly in your own projects: ➡️ [https://www.nico-essig.com/product-page/billie-eilish-happier-than-ever-vocal-template] * --- **🙌 Support the Channel & Get More Content\!** Help me create more in-depth tutorials and become a patron: ➡️ https://www.patreon.com/c/AudioSweetener --- **More Ways to Help & Connect:** * **🛒 Shop Vocal Templates:** Explore my full range of professional vocal presets: [https://www.nico-essig.com/shop] * **📸 Follow on Socials:** Stay updated and connect with me\! [https://www.instagram.com/nico\_essig/] [https://www.tiktok.com/@nico\_essig] * **🌐 My Website:** For more news, portfolio, and insights: [https://www.nico-essig.com/] * **🎧 Equipment Recommendations:** Gear I use and recommend: [https://amzn.to/4cbrDzJ] * **▶️ My YouTube Channel:** Subscribe for more mixing secrets\! [https://www.youtube.com/channel/UC397SZv7zBQ2f5nmOXsFhhQ](https://www.youtube.com/channel/UC397SZv7zBQ2f5nmOXsFhhQ) --- **⏰ Timestamps:** * 0:00 Introduction * 0:39 Compression * 1:49 EQ * 3:30 De Esser * 4:09 Conclusion --- **Disclaimer:** A sound-alike vocal and beat was used for this tutorial to demonstrate mixing techniques inspired by Billie Eilish's production style. --- **\#️⃣ Relevant Hashtags & Keywords (for YouTube Tags Section):** \#BillieEilish \#VocalMixing \#MusicProduction \#BillieEilishBlue \#BlueSong \#VocalTutorial \#AudioMixing \#StudioSecrets \#BillieEilishVocals \#VocalChain \#HowToMixVocals \#VocalProduction \#MixingTutorial \#HomeStudio \#AudioEngineering \#Compression \#EQ \#DeEssing \#VocalSound \#SoundDesign \#ProTools (or your DAW) \#NicoEssig \#AudioSweetener \#BirdsOfAFeather search) \#GettingOlder billie eilish vocal cuts,billie eilish vocal stems,billie eilish vocal effect,music production,billie eilish wildflower,vocal soudn,vocal sound effects,sing like billie eilish subliminal,learn how to sing like billie eilish,how to sing like billie eilish lovely,how to sing like billie eilish tutorial,billie eilish sing not like us,billie eilish vocal chain plugins exposed,billie eilish vocal chain plugins,billie eilish vocal chain,how to sound like blue --- This revision should now accurately reflect the content of your video focusing on "Blue." Let me know if you need any further adjustments!
Смотреть
Смотреть
How to sound like Billie Eilish Blue
Billie Eilish BLUE Vocal Tutorial I m working on a full length detailed video for this one. thank for the support
Смотреть
Смотреть
3 techniques for Beefier Drums
3 techniques for Beefier Drums Three plug-ins to make your drums beefier. Lofi Adding 0.2 to.0.4 of saturation directly on the track adds that extra texture. A little can go along way. Ozone vintage comp. This compressor just by default as this extra glue that I really like. It either works or doesn't. Most of the time I like it. Using parallel compression API 2500 compressor Duplicate your audio track or put it on a send compress heavily blend in to taste
Смотреть
Смотреть
How to EQ EDM POP Vocals
How to EQ EDM POP Vocals A quick tutorial on EQing Vocals for EDM/Pop music
Смотреть
Смотреть
4 Plugins - Rock Bass Sound Tutorial
What's your favorite rock bass chain? This is mine. Kramer Pie Compressor Get it nice and SQuashed SSL EQ Cut Subs Boost about 60-70 And some Presence and highs On Aux Send On Aux Send Decapitator MidDriver "Punish" On Microshift this is a bit weird but try it can add that extra Dimension
Смотреть
Смотреть
4 Plugins - Ozone 11 EDM MASTERING Tutorial
EDM Mastering Ozone 11 Simple House/Edm Mastering Digital EQ Filter out Subs that are not needed Add a bump right over the cross over for fullness Presence Add a bit of 2-4K Vintage Comp Adds a touch of Glue and Warmth Clarity Tilt at +1 Amount around 10-20 Move cross over to focus more on vocal presence Bounce .wav @24 bit files
Смотреть
Смотреть
7 plugins - Alt pop vocal chain tutorial
7 plugins - Alt pop vocal chain tutorial WARM Female Vocal Chain Rcomp Get 3-4:1 Ratio Mderate Attack SSL Channel EQ Look for the cross over on your high pass filter Cut some low Mids to open up the sound DeEss Trying to catch Sibilance only Plate Reverb 1.8sec Decay 150ms Pre Delay 13K HF Cut Echo boy delay Half note on the left quarter note on the right Style “Verbed” Micro shift plug-in Heavy shift preset Little Alter Bot Pitch -12 Formant -4
Смотреть
Смотреть
4 Ozone plugins - hiphop mastering tutorial
4 Ozone plugins - hiphop mastering tutorial Simple techinc EQ Low End Focus Clarity Maximizer
Смотреть
Смотреть
5 EQ Moves 🔥 Pro Guitar Tone i
Get a Pro Tone in 5 EQ Moves 🔥 Step 1 find the Cross Over for the LowEnd This is the Spot where you start noticing the sound getting thiner within the mix Step 2 with a Wide Bandwidth Open up some of the low mids this will prevent the sound getting too muddy Step 3 To add more Body to the ton add a Bump Right above the Low Cut a little goes a long way Step 4 With a Wide Bandwidth Add some “Air” top open the sound even more this will add more “pick” to the tone Using a multi band compressor, can help control and shape the tone. Using the wet, dry slider can help you Dial in to Taste
Показать еще
bottom of page